|
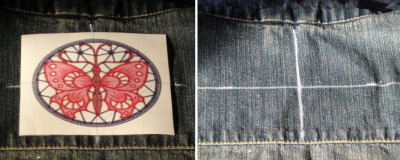
1. Select suitable lace designs and a garment. We picked up an old denim
jacket, and decided to decorate it with butterfly
lace inserts. We'll demonstrate the entire process of making the first
insert on this jacket's back. Here's how the jacket looked first:

2. To put a round butterfly lace design in the very middle of the back,
we located that middle by measuring the jacket back and making a vertical line
across the middle of the back. (The mark is washable). Of course, this step
will be a bit different for each new project.


3. Print the paper template of your design and put it over the garment
for a moment, to make sure that the design size is okay. Then mark the
horizontal line of the design template. Be sure to mark it so that the vertical
and horizontal lines meet exactly in the middle of your design.

4. Hoop 2-3 layers of water-soluble
stabilizer. (Different brands require different number of layers.)
Attention: It may seem to you that one layer of strong WSB is enough,
but many machines start breaking thread terribly when only one layer on WSB is
used. We've noticed that an extra layer of water-soluble backing often solves
this problem. So avoid trying to save an extra layer, even if your WSB is very
strong.
Make sure that the WSB can't move, even slightly. If your hoop is far from
perfect and holds fabric badly, consider purchasing a new hoop with special
metal spins. This is quite a small expense, and it can take your embroidery to
a much higher level. Most machine dealers now carry these wonderful new hoops
with spins. (As a temporary solution, you can wrap a paper towel around one old
hoop frame, to increase friction and prevent your backing from moving.)
On our photo, you see a fabric-type
water-soluble backing. It looks, feels, hoops and embroiders just like
fabric, but then washes away easily. For lace, it's better than the all
film-type of water-soluble backings because it doesn't stretch and itís not
slippery. It holds better in the hoop, and better supports lace designs through
the entire embroidery process.

5. Draw horizontal and vertical lines on the hooped WSB, exactly in the
middle. Then insert at least 3 thumb tacks/pins from the bottom. This is a
small, but helpful trick that allows VERY precise positioning of the garment
while doing hoopless embroidery.
The tacks will help you center the garment and secure it on exactly the right
spot. One tack/pin should be in the very middle, one on the vertical line mark
and one on the horizontal line mark.

6. Apply a
generous amount of temporary
spray adhesive over the very edge of the hooped water-soluble backing. (The
middle should be free of adhesive; otherwise, it may be more difficult to cut a
hole in the fabric later).
Position the garment exactly according to the marks on the stabilizer and on
the garment itself. If everything is okay, the pins should come through at the
center, horizontal and vertical lines on the garment. When it's positioned
correctly, press the garment over the stabilizer, to make it stick well. The
spray adhesive should hold the garment in place. Only then remove the tacks and
insert the hoop into embroidery machine.


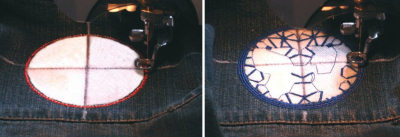
7. Embroider the first thread of the lace design. This should be a
running stitch. Its purpose is to outline the area of fabric where you should
cut out a hole for the lace insert.

8. Using scissors with sharp blades cut out the piece of fabric inside
the outline. Be careful not to damage the water-soluble backing. It should
remain where it is, safe and sound. Here's how the whole thing should look
after you cut a hole in the fabric:

9. Insert the hoop back into your machine and embroider the rest of lace
design, following the thread change list. Here are a few photos "in
process":


10. When you've embroidered all the inserts you want, wash away the
water-soluble backing in warm water. If you want the lace to be as soft as
possible, you may even leave the item in warm water for half an hour or so, to
make sure that all of the water-soluble substance dissolves.
Dry your project carefully by spreading it flat on a towel, and enjoy the
results!
See how cool our finished jacket looks:


If you'd like to get Butterfly Lace Medallions, stabilizer or thread used in
this project - please visit these links:
Butterfly Lace Medallions
Machine Embroidery Thread
Water soluble stabilizer fabric
Temporary Spray Adhesive
There is one more set in this technique. It's called Dantela
Lace Blocks, and it also supports in-hoop lace inserting.
<- Back to the main menu
|
